To add custom code to Shopify, log in to your Shopify Admin and navigate to Online Store > Themes. For adding simple section-based code like HTML or a YouTube embed, click Customize, add a Custom Liquid block to your desired page, paste your code, and click Save. For pasting site-wide code (such as a Facebook Pixel or Google Tag Manager), click the three dots next to your theme, select Edit code, locate the theme.liquid file, paste your snippet immediately before the closing </head> or </body> tag, and save your changes. Always duplicate your theme before making advanced code edits.
Key Takeaways
- The safest way to add visual custom code to a specific page or section is by using the Custom Liquid block inside the Theme Editor.
- For running site-wide tracking scripts, editing the theme.liquid file is the required approach.
- Always create a duplicate of your live theme before tampering with the source code to avoid catastrophic errors.
- You can add aesthetic changes natively via the Custom CSS section in your theme settings without touching raw files.
- Using dedicated custom code apps can be a much safer alternative for beginners without any coding experience.
Every Shopify merchant eventually reaches a point where the default theme settings just aren’t enough. Whether you want to embed a custom pricing calculator, add a unique animation, install a tracking pixel, or completely revamp a product page layout, knowing how to add custom code to Shopify is an essential skill for scaling your e-commerce business.
While Shopify’s drag-and-drop editor is incredibly powerful and continuously improving with every update, unlocking your store’s full potential requires a bit of coding magic. Fortunately, you don’t need to be a senior developer to make these visual tweaks and tracking additions. You just need to know where to look.
In this comprehensive guide, we will walk you through the exact methods to inject custom HTML, CSS, JavaScript, and Liquid into your Shopify store safely, properly, and effectively.
Why Do You Need Custom Code in Shopify?
Shopify themes are built to be universally appealing, which means they cater to the masses, not your specific niche requirements. Custom code bridges the gap between a standard, recognizable template and a highly converting, unique storefront that perfectly matches your brand identity.
Here are the most common reasons merchants find themselves needing to add custom code to their websites:
- Advanced Tracking and Analytics: While basic tools are integrated, adding specific scripts like Google Analytics 4, Meta Pixel events, or TikTok Pixel scripts often require manual script placement to track specific user behaviors and conversions accurately.
- Custom Styling and Branding (CSS): Changing the font size, specific brand hex colors, hover effects, or margins of elements that your base theme editor simply doesn’t provide controls for.
- Third-Party Integrations: Embedding external forms, marketing widgets, review platforms, or live chat software (like Zendesk, Intercom, or Tidio) that require a JavaScript snippet to function globally.
- Advanced Functionality (Liquid): Creating dynamic text replacements, conditional logic (like showing specific text only if a product belongs to a certain collection), or rendering unique product variables using Shopify’s native templating language.
Prerequisite: Always Duplicate Your Theme First
Before we dive into the technical steps, let’s establish the absolute golden rule of Shopify development: Never edit your live theme without creating a safe backup.
If you accidentally delete a crucial line of code, miss a closing tag, or misspell a variable, your entire storefront could break. This mistake costs you immediate sales while you scramble to diagnose and fix the issue. Creating a duplicate ensures you always have a working copy to fall back on instantly.
How to quickly duplicate your theme:
- Go to your Shopify Admin dashboard.
- Click on Online Store on the left-hand menu and select Themes.
- Find your current active, published theme.
- Click the Three Dots (…) next to the green customize button.
- Select Duplicate from the dropdown menu.
This simple action creates a carbon copy of your store listed under your “Theme library”. If anything goes wrong in the live environment, you can simply publish the duplicate and restore your site perfectly in seconds.
Method 1: Using the Custom Liquid Block (The Safest Method)
If you are using an Online Store 2.0 theme (like Dawn, Sense, Spotlight, or any modern premium theme), Shopify has provided a built-in feature called the Custom Liquid Block. This is by far the safest and most user-friendly way to add targeted code because it completely removes the need to touch the raw, underlying theme files.
This method is absolutely perfect for embedding YouTube videos, adding custom HTML trust badges, or inserting basic CSS rules that only need to apply to a specific section of a single page.
Step-by-step instructions:
- Step 1: Log into your Shopify Admin and navigate to Online Store > Themes.
- Step 2: Click the green Customize button on your current active theme to open the visual theme editor.
- Step 3: Use the top-center dropdown menu to navigate to the exact page where you want the code to appear (for example, navigating to Products > Default product).
- Step 4: On the left-hand sidebar layout tree, click Add section or Add block (depending on where you are trying to place the element).
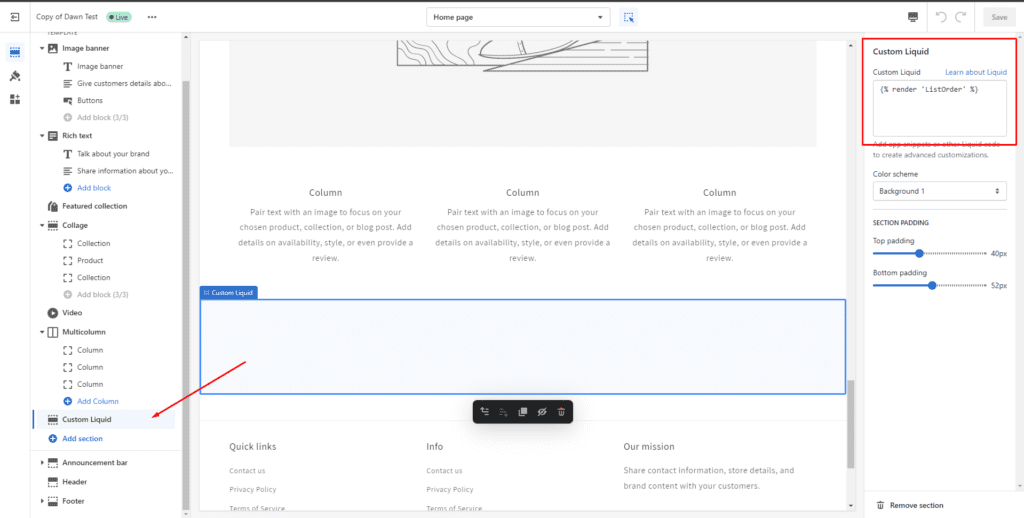
- Step 5: Search for and select Custom Liquid from the options.
- Step 6: A blank text box will appear on the right side of the screen. Paste your HTML, CSS, or Liquid code directly into this box.
- Step 7: Preview the changes instantly, then click Save in the top right corner.
Pro Tip: If you are adding CSS within this block, make sure to wrap your code in <style> tags. If you are adding a JavaScript snippet, wrap it in <script> tags.
Method 2: Editing the theme.liquid File (For Site-Wide Code)
Sometimes, you need code to run independently on every single page of your website. The most common examples of this requirement are global tracking scripts, domain verification tags, or sitewide alert popups.
To achieve this global functionality, you need to edit the master file that controls your theme’s structural layout. In Shopify, this master template is called theme.liquid.
Step-by-step instructions:
- Step 1: In your Shopify Admin, go to Online Store > Themes.
- Step 2: Click the Three Dots (…) next to your active theme.
- Step 3: Select Edit code from the dropdown menu to open the developer backend.
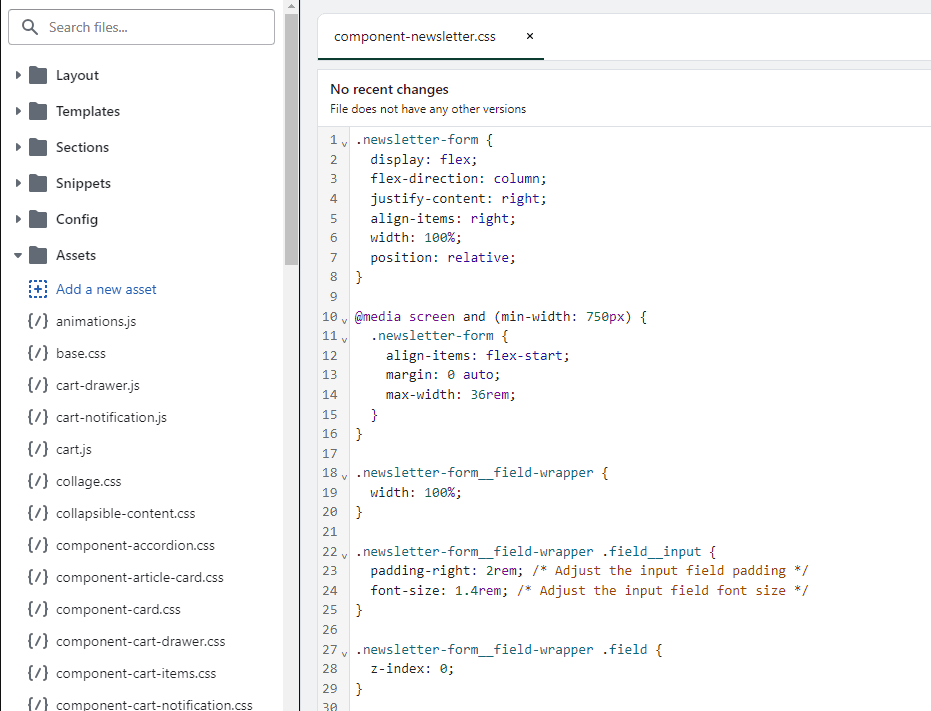
- Step 4: On the left sidebar navigation, under the Layout folder, click on the theme.liquid file to open it in the code editor.
- Step 5: Read the instructions provided by the third-party service and locate the appropriate area to paste your code. – If a service explicitly asks you to paste code “in the header,” scroll down and paste it safely just above the very first </head> tag. – If a service asks you to paste code “in the footer or body,” scroll to the very bottom of the entire document and paste it just above the closing </body> tag.
- Step 6: Click the Save button in the top right corner. Test your live website to ensure everything functions properly.
Method 3: Adding Custom CSS in the Theme Settings
If your only goal is to alter the visual appearance of your site (changing colors, tightening spacing, adjusting fonts) and you don’t need to add new structural HTML elements or tracking scripts, you can add Custom CSS directly within the visual theme editor. This native integration keeps your custom CSS isolated, organized, and remarkably easy to manage without digging through massive, sprawling stylesheet files like base.css.
Step-by-step instructions:
- Step 1: Go to Online Store > Themes and click Customize.
- Step 2: On the far left vertical sidebar, click the Theme settings icon (it typically looks like a paintbrush or a gear icon).
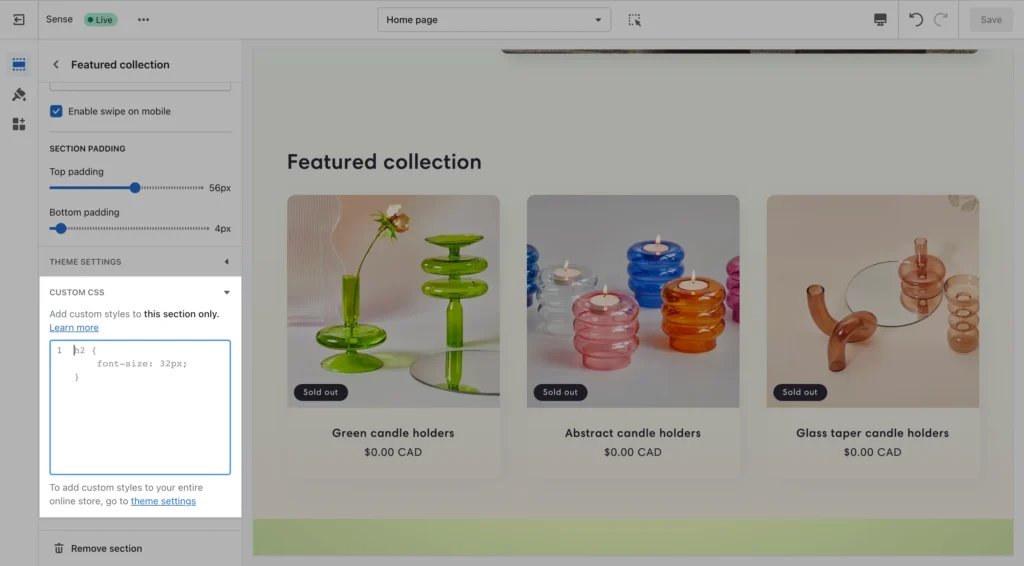
- Step 3: Scroll all the way down to the bottom of the list and click to expand the Custom CSS section.
- Step 4: A code editor box will slide out. Paste your pure CSS code directly here. Do not include HTML <style> tags in this specific box; it expects only CSS rules.
- Step 5: You will see the visual changes apply in real-time on the right side preview of your screen. Validate the styling on both mobile and desktop views.
- Step 6: Click Save.
Method 4: Using Dedicated Shopify Apps for Code Injection
If the thought of touching any code still terrifies you, there is absolutely no shame in relying on third-party apps. The Shopify App Store has dozens of secure tools designed specifically to inject scripts and styles without ever requiring you to open the backend code editor yourself.
These apps act as a graphical user interface for your headers and footers. They are especially useful if you manage an agency or have multiple marketing team members who need to add tracking pixels dynamically but shouldn’t be granted full access to edit the theme code.
Popular apps for safely adding custom code:
- Insert Headers and Footers: A brilliantly simple application that gives you discrete, easy-to-read text boxes for global header, body, and footer scripts.
- XO Insert Code: This app allows you to specify exactly which pages a script should fire on, dramatically improving overall site speed by preventing unnecessary global script loads.
- Google Tag Manager: While technically a free external Google product, integrating GTM allows you to manage all your various tracking codes from one external dashboard. This inherently keeps your Shopify theme clean and lightning fast.
Common Mistakes to Avoid When Editing Code
When adding custom code, even a tiny, seemingly insignificant typo can cause immense frustration and visual chaos. Keep these common technical pitfalls in mind to ensure a spectacularly smooth development process:
- Missing Closing Tags: Every single opening HTML tag (like a <div>) absolutely needs a corresponding closing tag (like a </div>). Failing to close a tag can completely break your entire page layout structure, causing elements to shift wildly out of place.
- Pasting Scripts in the Wrong Place: JavaScript fundamentally slows down page render and load times. Unless specifically instructed to place a script directly in the <head>, always attempt to put external scripts at the very bottom of your theme.liquid file before the </body> tag so the visual page loads first for the user.
- Overwriting Original Code: When editing raw files, always hit ‘enter’ to create new, empty lines to paste your code onto. Never highlight and forcefully delete existing Shopify proprietary code unless you are absolutely certain of what it does and know it is safe to remove.
FAQs
Will adding custom code permanently slow down my Shopify store?
It completely depends on the type of code. Simple HTML structures and custom CSS will have practically zero measurable impact on your site speed. However, adding large JavaScript files or relying on multiple third-party tracking scripts will definitively impact your Core Web Vitals and load times. Always audit your loaded scripts regularly and remove ones you no longer use.
Can I use backend languages like PHP or Python in my Shopify theme?
No. Shopify is a securely hosted SaaS platform with a tightly closed backend architecture. You cannot run traditional server-side languages like PHP, Python, or Ruby directly inside your theme editor. You are entirely restricted to functional client-side languages: HTML, CSS, JavaScript, and Shopify’s proprietary templating language, Liquid.
What practically happens to my custom code if I update my published theme?
If you intelligently added your specific code via the Custom Liquid block or the Theme Settings Custom CSS, that code will easily transfer over when you update your theme in the Shopify admin UI. However, if you directly hardcoded changes into the theme.liquid file or added custom structural assets, you will unfortunately need to manually copy and paste those changes directly into the new, updated theme version.
Where exactly should I add Google Analytics code?
In modern Shopify environments, you should not paste raw Google Analytics snippet code into your theme.liquid file manually. Instead, strictly install and use the native Google channel app located in the Shopify App Store. The app seamlessly and automatically integrates alongside formatting your tracking code correctly for all vital ecommerce layer events.
Conclusion
Adding custom code to Shopify is the perfect way to truly elevate your store from a recognizable, generic template to a highly optimized, beautifully brand-specific ecommerce machine. Exploring these methods opens up a world of customization.
Whether you are strictly using the localized Custom Liquid block for a quick video embed, dynamically adjusting the global Custom CSS for the perfect call-to-action button color, or carefully editing the theme.liquid file to accurately install complex marketing trackers, you now successfully possess the foundational knowledge and the tools to do it safely.
Always vividly remember to duplicate your theme before making any changes. The more comfortable and experienced you get experimenting with HTML, CSS, and Liquid, the more granular control you will ultimately command over your digital storefront’s conversion rate and unique user experience. Happy coding!